Codux Help Center
Browse our articles to find the answers you need
Creating Component Templates
Out of the box, Codux comes with a simple built-in template for new components. When users create a new component, they'll see a simple text div to get them started.
To give them a jump start, you can create a custom template with more relevant elements, style sheets, and other related files for them to base their new components off of. Codux will generate new component files using the template's code, and copy the relevant files over to the new component.
Important!
To create new components in any project, you first need to tell Codux where to save new component files to. Use the
componentsPath configuration property for this.Setting the Path for Storing Component Templates
Inside the codux.config.json configuration key
newComponent, use the templatesPath property to configure the templates path: Property | Type | Description |
|---|---|---|
newComponent (required) | Object | The main configuration object for templatesPath. |
templatesPath (optional) | String | The relative path to the component templates folder. |
How do I add this entry to codux.config.json?
Here's an example:
1 2 3 4 5 6{ "$schema": "https://wixplosives.github.io/codux-config-schema/codux.config.schema.json", "newComponent": { "componentsPath": "src/components", "templatesPath": "src/component-templates" }
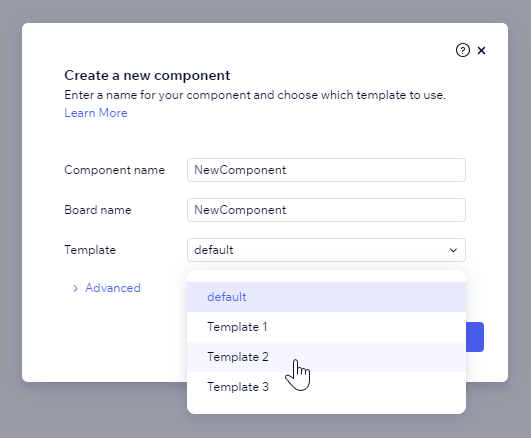
Templates in this path will show up in the new component dialog for users to select.
Creating the Templates
Step 1: Create a Folder for the Template
To create a custom template, you first need to create a folder for the template in the path defined above through codux.config.json. For example, if the
newComponent/templatesPath property is set to "src/component-templates", create the folder for your template inside that directory.Step 2: Add Component Files to the Template
Every component template must contain a component file. Codux will tell you that the template is invalid if you don't include one, so start by creating this file and adding it to the template path. Make sure to name it 'new component' in any of the following valid file-naming conventions:
new-component.tsx(kebab-case)NewComponent.tsx(pascal-case)newComponent.tsx(camel-case)
Then add other related files (such as styling files) that this component file needs to the same directory.
Important!
New component files will be created following the convention of the component file of the template. For example, if the template component file is named newComponent.tsx (camel-case), a new component created from the template will also be named in camel-case. This will lead to problems if no file-naming convention configuration is set (since the default convention is kebab-case), or if a different configuration (like pascal-case) is set, because the new board file and path won't have matching conventions. Make sure that your component template files match the default or configured file-name convention.
Here's an example of a project directory structure with three component templates:
├── src
│ ├── components
│ ├── component-templates
│ │ ├── toggle-control
│ │ │ ├── new-component.css
│ │ │ ├── new-component.tsx
│ │ ├── button
│ │ │ ├── new-component.tsx
│ │ ├── other-template
│ │ │ ├── new-component.tsx
In this structure:
srcis the root directory where source files are located.componentsis a directory that would typically contain individual component files.component-templatesis a directory that contains subdirectories for different types of component templates.toggle-controlis a template directory with its own CSS and TypeScript files.buttonis another template directory with a TypeScript file.other-templateis a third template directory, also with a TypeScript file.
Important!
Each template must have exactly one component file, but may contain multiple accompanying styling, testing, image files and even other component files that it depends on. If your template is a single file, that's also fine – templates can contain only a single component file. More than one component file in a folder (each using a different naming convention), however, will result in undesirable behavior, so only include one component file per template!
Step 3: Create a New Component from a Template
The video below shows what happens when a component (named ToggleSwitch
Behind the scenes, Codux takes the code from the component template file and saves it to the new component file. Here's how the template component file in this video looks:
1 2 3 4 5 6// new-component.tsx import React from 'react'; import './new-component.css'; export const NewComponent = () => ( <div className="newComponent">I am a NewComponent made from a template</div> );
Notice how references to the component's name in the new component file created in the video (shown below) match the name of the new component? Codux replaces these automatically.
New Component (ToggleSwitch)
1 2 3 4 5 6// toggle-switch.tsx import React from 'react'; import './toggle-switch.css'; export const ToggleSwitch = () => ( <div className="toggleSwitch">I am a ToggleSwitch made from a template</div> );
Was this article helpful?